Creating Plugin for ContentBuilder.js
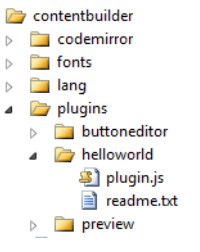
Plugins are placed in the contentbuilder/plugins/[plugin name] folder. For example, we created a plugin named helloworld. The location would be:
contentbuilder/plugins/helloworld/

In this folder, the plugin’s script file should be named: plugin.js.
Here is our helloworld's plugin.js code:
plugin.js
/*
Hello World Plugin
*/
(function () {
if(typeof _cb === 'undefined') return;
var button_html = '';
_cb.addButton('helloworld', button_html, '#my_helloworld_button', function () {
alert('Hello World');
});
})();
In this example, we called an addButton() function to register a button and specify its callback function. The addButton() function has 4 parameters (see line 9 above):
1. Plugin name
2. Button's HTML
3. Button ID
4. Callback function. Triggered on button's click.
Then, you can load the helloworld plugin by adding it into the plugins list:
config.js
var obj = new ContentBuilder({
    container: '.container',

    // Load plugins
    plugins: [
        ..
        { name: 'helloworld', showInMainToolbar: true, showInElementToolbar: false },
    ],
    pluginPath: 'contentbuilder/', // Location of the plugin scripts
});
In the plugins parameter, we added the helloworld plugin as follows:
- name: helloworld
- showInMainToolbar: true
- showInElementToolbar: false
Reload the builder and you will see a new helloworld button added on the main toolbar:

You can make the helloworld plugin visible on the element toolbar by setting showInElementToolbar to true. Here is the plugin button displayed on the element toolbar.

Note that the difference between the main toolbar and the element toolbar is that the main toolbar is used for text formatting, that is when the cursor is placed on text and the element toolbar is displayed only when non text element is selected. Please refer to the ContentBuilder.js documentation for more info on main toolbar and element toolbar.
To make the plugin button works on the element toolbar, we need to add a few code on the plugin.js as follows:
plugin.js
/*
Hello World Plugin
*/
(function () {
if(typeof _cb === 'undefined') return;
var button_html = '';
_cb.addButton('helloworld', button_html, '#my_helloworld_button', function () {
alert('Hello World');
});
_cb.addButton2('helloworld', button_html, '#my_helloworld_button', function () {
alert('Hello World');
});
})();
Here we called an addButton2() function, which is similar to the addButton() function. The button2() makes the button works on element toolbar.
Adding Button with an SVG Icon
Now we will modify our helloworld plugin to use icon for its button. For this, we can use SVG image. Here is an example:
/*
    Hello World Plugin
*/

(function () {
    if(typeof _cb === 'undefined') return;

    var button_html = `<button id="my_helloworld_button" title="Hello World" style="text-transform:none">
        <svg style="fill:rgba(0, 0, 0, 0.7);width:17px;height:17px;" viewBox="0 0 512 512" xmlns="http://www.w3.org/2000/svg">
            <g>
                <path d="M320 480H192v-96h128v96zm-16-160h-96L192 32h128l-16 288z"></path>
            </g>
        </svg>
    </button>`;

    _cb.addButton('helloworld', button_html, '#my_helloworld_button', function () {

        alert('Hello World');

    });
    _cb.addButton2('helloworld', button_html, '#my_helloworld_button', function () {

        alert('Hello World');

    });

})();
Reload the builder and you will see that the SVG icon is displayed:

Please check: A Pretty Good SVG Icon System
Useful Methods for Creating Plugins
In addition to the addButton(), addHtml() and addCss() methods, here are useful methods you can use:
addCss(css)
Adding a css. Example:
   var css = `<style>
   		.my-element {
          ...
          }
        </style>`;

    _cb.addCss(css);
addHtml(html)
Add HTML content. Example:
var icon_html = `<svg width="0" height="0" style="position:absolute;display:none;">
<defs>
<symbol viewBox="0 0 512 512" id="myicon">
includeCss(filename)
Include a css file for plugin use.
includeJs(filename, callback)
Include a js file for plugin use. Callback function is called after the js file fully loaded.
pasteHtmlAtCaret(html, selectPastedContent)
Insert an HTML into content at text cursor (caret) position. The selectPastedContent value is true or false. If set true, the inserted HTML will be automatically selected.
showModal(modalElement, overlayStay)
To display a custom modal.
Before using the showModal() method, you need to prepare and embed a modal HTML. The modal HTML format should be:
<div class="is-modal mymodal">
	<div style="max-width:300px;height:200px;">
		<div class="is-modal-bar is-draggable">
			<div class="is-modal-close">✕</div>
		</div>
		…modal content here..
	</div>
</div>
Please use the addHtml() to embed the modal HTML. Then to show the modal, call the showModal() method:
var modal = document.querySelector('.is-modal.mymodal');
_cb.showModal(modal);
The showModal() method has 2 parameters:
- modalElement: the modal element (use jQuery selector to get the element)
- overlayStay: true or false. If set true, clicking outside the dialog will not close the dialog.
hideModal(modalElement)
To hide modal dialog.
A simple example of using showModal() and hideModal() methods can be seen on the plugin named Word Count that is included in the ContentBuilder.js package. The plugin is located in:
contentbuilder\plugins\wordcount\plugin.js
out(text)
To write text with multi-language support. For example, you write a text ‘Word Count’:
_cb.out(‘Word Count’);
With this, in contentbuilder/lang/[language code].js you can add
_txt[‘Word Count’] = '… translation here...';
For more info on multi-language support, please see readme.txt in the package.
Note
Plugins can be useful for improving ContentBuilder.js with custom editing features.
If you have the ContentBuilder.js source code (SUPER license), you may find useful codes related with content editing that you can copy, modify and use for your plugin development.
